Best C-line
How to Make CCcam.cfg File
(Method One)
First, create a simple text document.
Put your CCcam lines in it. Make sure your Lines have the correct format according to your box.
Note: usual format of CCcam lines is C: server port user pass
Now from the top left side of your text document click File > Save As ....
At the bottom there is a section called "Save As Type", change it to "All Files".
Then from the top of it in "File Name" write CCcam.cfg and save it.
Note: remember it`s vital that the first two C`s be in Caps Letters.
Thats it, your CCcam.cfg file is ready to be used.
(Method Two)
You can download an already created CCcam.cfg file, open it using a notepad and place you clines in it.
Click here to download the CCcam.cfg file
The file is in a zip folder so obviously you need to unzip it first.
Now right click on the file and choose "Open with ..."
Open the file using "Notepad" or "Text Document"
Once it`s open, place the clines you have into the cfg file, close the file and save changes.
That`s it, file is ready to be used on your box.
How to Install Dreambox Control Center (DCC)
First of all click here to download the zip folder containing DCC version 2.96
Now extract the folder and open DCC.

1.First assign your box user/pass then the preferred language. Connection Type must also be chosen.
Note: If you connect to your box directly from your laptop/pc choose "Direct Crossover" but a router is on the way "Router" must be chosen.

2.Now you need to assign the proper IP Address of each device.
Note: If you know the correct IP address of your box and router, there is an empty space above the Search button. Mouse over there and type the IP address.
If you dont know the correct IP address, click on Search and let the DCC scan and find the correct IP addresses.
Now I`m going to scan for the right IP address of my box. I click Search

3.At the top you can see the Address range where you can assign the range of IP address which your Network is based on.
My range is 192.168.2.1-254. Clicking on search will start the scanning process.
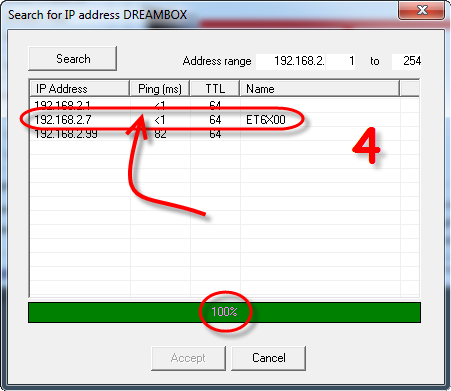
4.Scanning process is done. 3 IP`s have been found.
the IP ending in 2.1 is my Router, the one with 2.7 is my Box and 2.99 is another device.
So I double click on the second IP in the list to assign it as my box IP in DCC.
Do the same procedure for your Router.

5.Now that we have assigned proper IP`s on my device, we`re gonna click on Reconnect to see if it`s working.

6.All signs show that our connection is healthy and we are connected to our box through our router.

7.So let`s go to the FTP section and see how we can manage our files between pc/laptop and the box.

8.As you can see this section is divided into two halves.
Right side is our Receiver box and the left side is our PC/Laptop.
You can simply exchange between these two using the two arrows in the middle.
How to Setup CCcam on Skyboxf3-f5
First you need a cfg (config) file which contains your CCcam lines.
Put the cfg file on a USB flash and attach it on one of your USB terminals behind the back of your Skybox. Then turn it on.
Now press Menu on your remote control, go to network local setting and go to Camds Setup then click CCcam Client Setup .
Note: if you dont see Camds Setup, press 6666 to unhide it.
Now you have to click Update Files by USB so that your box starts reading the usb flash.
An option is named CCcam.cfg, go on it and press OK so that a green tick appears.
Finally you need to click the Yellow button on your remote control in order to read the CCcam.cfg file from your USB.
If everything goes properly, these messages should appear:
"Find New Account" "Save Data OK" "Read All Finished"
Now exit from all settings, turn your box off/on from power button on your remote control.
There you go, you`ve setup a CCcam account on your Skybox.
How to Setup CCcam on Dreambox500/800
For transferring the CCcam.cfg file into your dreambox500/800, you need to use a FTP client. we suggest DCC!
Now, you just need to transfer the CCcam.cfg file into the /var/etc/ folder.
Note: If you already have a CCcam.cfg file in that location, simply right click the file and click edit to put your C-lines in it and save the file.
Reboot your box and your CCcam Service will start working.
How to Setup CCcam on VU+ Solo or DUO
For transferring the CCcam.cfg file into your VU+ SOLO or DUO, you need to use a FTP client. we suggest DCC!
Now, you just need to transfer the CCcam.cfg file into the /var/etc/ folder.
Note: If you already have a CCcam.cfg file in that location, simply right click the file and click edit to put your C-lines in it and save the file.
Reboot your box and your CCcam Service will start working.
How to Setup CCcam on Technomate
To install cccam on technomate boxes, Simple procedure has to be followed.
First start up your box. Now follow these steps:
-Press and hold the power button on your box front panel as it starts up
-A number will appear in your front display and thats what your box IP Address ends in.
Note: For example if the number is 5, then your box Ip Address is 192.168.2.5
-Now with a web browser you need to connect to that IP by typing it in the browser.
Note: Remember your PC/Laptop must be on the same IP range 192.168.2.xxx
-On bottom right of this page you`ll see "CCcam Edit" under the menu Edit Email Config. Press "Click"
-If it requests for password, type and proceed
-Finally a field will appear with a button beside it called "Add Line"
-Remember the line format you should enter is like this: C: server port user pass
This was the standard procedure for installing CCcam on technomate boxes.